29.6.12

RECIPE: S'MORE BROWNIES


S'more Brownies

1 box of brownie mix
Graham cracker crumbs
Mini marshmallows
Milk chocolate chips
Semi-sweet chocolate chips

1. Follow the instructions on your brownie box, and bake your brownies for only half the time it requires (mine was 15 mins).

2. Remove brownie from oven. Add graham cracker crumbs, mini marshmallows and milk chocolate chips on top of brownie mix. Put back in oven and bake for remaining time as directed on box (another 15 mins for me!). 
***I just estimated amounts***

3. Meanwhile, melt some semi-sweet chocolate chips on the stove top. When brownies are done, drizzle melted chocolate on top of s'more brownie mix.
***If I made these again, I would use A LOT less melted chocolate than I did, 
or simply eliminate this step. I found it to be waaay too much chocolate.***

4. Set in fridge until chocolate cools completely (at least 1 hour), and cut into small squares to serve. Enjoy!

TUB & SHOWER MAGIC - A PINTEREST CHALLENGE

I was SO thrilled when I finally tested out this popular pin. Scrubbing the shower with a magic eraser (as much as I love those things) is NOT my favourite chore. This DIY mixture of stuff you already have in your home is brilliant! Spray, leave for an hour, and wipe. DONE. And it seriously came off just like magic. Love it.

26.6.12

RECIPE: CHALLAH

Challah
(Jewish Egg Bread recipe from Nancy Sleeth: author of Almost Amish)

3/4 C warm milk
2 Tbsp butter
3 eggs
1 tsp salt
4 C white flour
1/2 C oat bran
2 Tbsp sugar
2 tsp fast-rising dry yeast

1. Mix all ingredients together & knead. Cover and allow to rise in a warm place until doubled. Once doubled, punch down & knead again. Divide into halves.

2. Divide each half into 3 equal pieces. Roll each piece into a long rope - making the ropes about the same length and thickness. Coat 2 baking sheets with parchment paper. Braid 3 ropes together on each baking sheet. Moisten fingers and seal ends together where 3 ropes join.

3. Allow to rise in a warm place, uncovered, until doubled. Bake at 350F for 12-15 minutes or until the top is golden and the bread sounds hollow when tapped. Do not overcook. If desired, lightly rub top of warm loaves with butter.

This recipe worked out really well for me and was really simple to make. I thought the braids would be really challenging, but it wasn't too bad! My first loaf was kind of fat, so I just rolled out the next 3 braids really thin to get a thinner loaf. This is such a pretty loaf, and makes a good impression! 

Also, I think I took the "do not overcook" too seriously, and although they were by no means undercooked, they didn't turn out quite as golden as the pictures I googled after the fact. But they still tasted really really good - especially when right out of the oven.

You can pull the bread apart piece by piece (kind of braid by braid) to eat, or slice the loaf on an angle. Nancy says this bread makes excellent French Toast on the second day, so we're going to have to try that soon! 

Enjoy!

PS - I was talking with my Jewish landlady and told her I was making "Chhhaalla" (like with what you would think a "ch" sound would make, as well as some very Canadian "a" accents).. and she was like... "uhh... khallah" (you know... with the kind of gollum throat thingy, and more of a "au" sound like in cauliflower). It was embarrassing.

22.6.12

RECIPE: NO BAKE ENERGY BITES

So we all know these no-bake energy bites have been floating around Pinterest for months now. I've had the recipe saved for quite some time and I finally got around to making them! And they are wonderful. They taste almost exactly like my granola recipe, but with mini chocolate chips instead of cranberries. The recipe made about 25 bites, with a reasonable amount of crumbs left over. The left over bits were mostly chocolate chips, so I saved them in a container to put over my oatmeal or yogurt. I highly recommend making these. They are so easy, take no time at all, and are delicious! Enjoy!

21.6.12

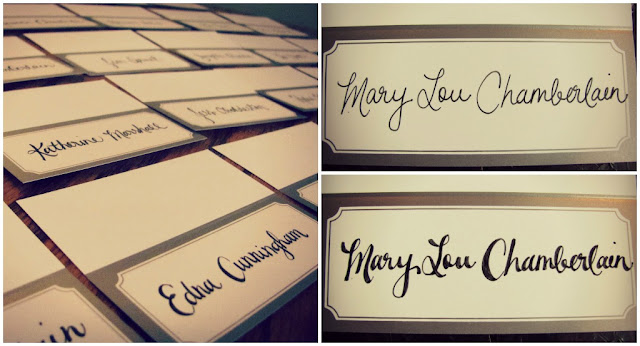
FAKE CALLIGRAPHY

Today's project - simple dollar store table name cards for an upcoming wedding. I have learned how to fake calligraphy handwriting - not too shabby I'd say! All you need to do is bold each down stroke in your letters. Easy and pretty!

20.6.12

HOT & COLD COMFORT BAG

So I pulled my neck on Sunday trying to roll over on the couch. Pretty lame eh? Well I've been meaning to make these DIY rice bags, so I finally did - even if it was a little too late. I've only made one so far, and it was sooo easy! I used a pair of Mark's old (clean) flannel boxers, and followed this tutorial. I don't have a sewing machine, so I did it all by hand, and it was super simple for my first sewing project (other than hemming pants)! See the tutorial for the complete how-to!

HONEY BUTTONS

 Decided to try out some local honey which I bought at the Natural Food Pantry just down the block. This honey is made in Ottawa, and it is DELICIOUS. So rich in flavour! Mark and I use honey almost every single day in our favourite breakfast and in my tea. Never going back.
Yesterday I found a picture of some cute button bracelets, and they looked like something fast and easy to make...
and they were! Love it.

Have an awesome first day of summer!

19.6.12

OATMEAL CHOCOLATE CAKE

On Saturday night (the night of the dessert auction) I received a text message from a good friend of ours that included this picture, to let me know that my cake sold for $150 at the auction!! OMGOODNESS. 100% of the proceeds go to Jericho Road, so I am SO thrilled I could help out, even though I couldn't be at the action myself. Get the recipe for my Oatmeal Chocolate Cake here!

15.6.12

RECIPE: OATMEAL CHOCOLATE CAKE

Made this today for the Jericho Road pasta dinner and dessert auction which will be held tomorrow. I made my very favourite cake: Oatmeal Chocolate Cake - a recipe I got from one of Mark's former high school teachers.  I lent my camera to my parents, so these pictures have been taken with my BlackBerry. Anyway, this is the first time I've ever tried to make a cake look a little fancy. Not too shabby I'd say! I used this tutorial that I found on Pinterest for the icing. It was pretty easy to do! I don't have any special cake icing utensils, so I simply stuffed a bunch of icing in a large Ziploc bag, tied an elastic tight around the top, and cut a teeny hole in the corner. Worked like a charm (DIY here). Anyway, here's the super simple recipe. You're going to LOVE this cake. (I doubled the recipe for the cake shown in the pictures, and stuffed the middle perimeter with raspberries, and topped it off with some more!)

Oatmeal Chocolate Cake

1/2 C oatmeal
1/2 C butter (cut in small chunks)
1 C boiling water
2 eggs, well beaten
1 1/2 C brown sugar
1 C flour
4 Tbsp cocoa
1 tsp baking powder
1 tsp baking soda
1/4 tsp salt

1. In a large bowl, pour boiling water over oatmeal and butter. Mix well, ensuring butter is completely melted.

2. Beat eggs, add brown sugar and all other ingredients. Mix, mix, mix!

3. Bake at 350F in a 9x9 inch pan for 40 minutes.

Icing

1/4 C softened butter
3 C icing sugar
2-3 Tbsp cocoa
2 Tbsp milk

Blend!

4.6.12

RECIPE: BLACK BEAN QUESADILLAS

1. I made quesadillas for the first time... (on our portable burners of course) and they were AMAZING! (recipe below)
2. I also roasted red peppers for the first time (in our convection toaster oven) and they also turned out great! They went into the quesadillas.
3. My old & horrible can opener finally broke... so I got a new one. IT IS INCREDIBLE. And comes with a 3-year warranty! I like that.

Rebecca's Black Bean Quesadillas

2 Tbsp oil
1 medium onion
3 cloves garlic, finely chopped
1 can black beans
1 roasted red pepper, chopped
4 (10 inch) tortillas
1 C chedder, shredded (maybe more...)
4 Tbsp fresh garden salsa (I used the kind from FarmBoy)
2 Tbsp fresh basil, torn
2 Tbsp fresh cilantro, torn
fresh lemon juice
1 avocado, sliced
(FYI... I kind of winged this recipe so all amounts are approximate)

1. Heat oil in pan over med-high heat.

2. Add onions & sauté until caramelized, set aside.

3. In a large bowl, mix garlic, black beans, roasted red peppers, basil, cilantro, and caramelized onions. Sprinkle with fresh lemon juice to taste.

4. Place tortilla in pan, sprinkle part of the cheese over half of the tortilla, then top with bean mixture and salsa. Top with more cheese.

5. Fold the tortilla in half covering the filling and cook until the quesadilla is golden brown on both sides & cheese is melted. 

6. Slice each quesadilla in 3 triangle pieces and serve with an avocado slice garnish. (I really liked the avocado on top, but my husband would have preferred it stuffed inside the quesadilla. Or you could always make some guacamole! Your call!)
Enjoy!